

How To Repair A Leaking Kitchen Sink Sprayer Head
How to Set up a Leaking Sink Sprayer
Updated: December. fourteen, 2022
Diagnose and cure pullout sprayer bug
Sink sprayers can develop leaks just like whatsoever other water line, but they're trickier to spot. The solution normally involves replacing either the spray caput or the spray caput and hose together.
You might also like: TBD
Video: How to Repair a Sink Sprayer
Solutions for common sprayer leaks
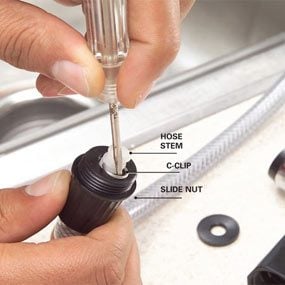
Photo 1: Supplant the spray caput only
Unscrew the spray head from the slide nut. Remove the washer and pry off the C-clip with a pocket-size screwdriver or knife. To install the new head, contrary these steps.
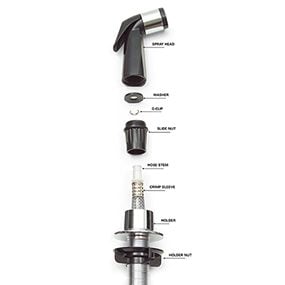
Spray head associates
Lay out the sink sprayer parts in lodge if you supersede the spray head.
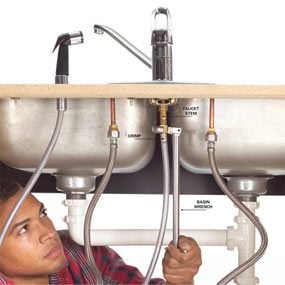
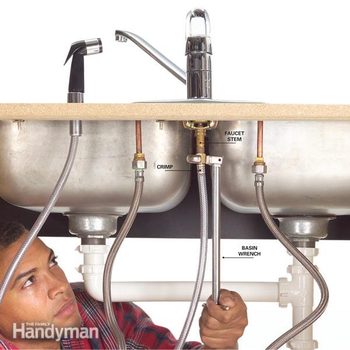
Photo two: Supervene upon the spray head and hose
Unscrew the hose with a basin wrench. Feed the new faucet hose through the holder. Wrap male threads with pipe thread record. Screw the hose to the faucet stem by hand. Then tighten the connection with the basin wrench.
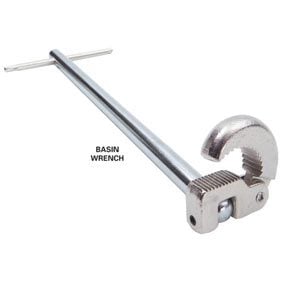
Basin wrench
Apply a basin wrench for hard-to-reach spots nether the sink.
Kitchen Spray Caput Replacement
If you find mysterious puddles under your kitchen sink, the most likely suspects are the water supply lines, the drain lines or the seal betwixt the sink and the countertop. Simply don't forget about the pullout sprayer. Sprayer leaks can fool y'all because they usually occur only when the faucet is running. At that place are only two fixes: Either supervene upon the spray head or both the spray caput and the hose.
Start, check the spray caput for leaks. Turn on the faucet and pull out the spray head. Make certain the slide nut is tightly screwed into the spray head. Bank check for leaks, so button the trigger and check again. If water leaks out from under the slide nut, remove the spray caput and slide nut. Plow on the faucet and expect for leaks around the crimp sleeve. If you find leaks around the crimp, you'll accept to replace the hose and the head. If the crimp doesn't leak, simply replace the caput (Photo one). Replacements are sold at domicile centers and hardware stores.
If the spray head doesn't leak, grab a flashlight, turn on the faucet and bank check under the sink. Requite the hose a quick inspection, and then examine the connexion under the faucet. If you find a leak at the crimp, replace the hose. If the leak is coming from the stem connection, attempt to tighten information technology. Yous might be able to tighten it with a small pliers, but it'due south tight quarters under in that location. The best tool for this task is a basin wrench (sold at home centers and hardware stores). If tightening doesn't solve the problem, replace the hose (Photo 2).
Hoses usually aren't sold separately, so yous'll get a new spray head, too. Some hoses take a female fitting that fits over the faucet stem. Others spiral into the faucet stem. Many spray head/hose kits include an adapter so the hose can connect to male person or female threads. As well selection up a roll of pipe-thread tape and wrap the male threads before yous connect the new hose. You don't accept to plough off the water supply to replace the hose, but make sure no one turns on the faucet while the hose is asunder! One time the new hose is installed, turn on the faucet and check for leaks.
Most spray heads and hoses are interchangeable parts. Simply some spray heads and hoses connect differently. Home centers and hardware stores usually carry only the standard type shown hither. If you have a dissimilar type, call a plumbing supplier (in the Xanthous Pages under "Plumbing, Fixtures") or go to any online search engine and blazon in the manufacturer of your faucet followed by "replacement parts."
Fix a Sink Sprayer
Within your faucet, there'due south a "diverter" valve, which stops the h2o flow to the spout and sends it to the sprayer when you press the sink sprayer caput's trigger. Here are the symptoms of diverter trouble:
- Very little water, or none at all, comes out of the sprayer when you press the trigger. A bad sprayer caput can cause this, but more oftentimes the diverter is the culprit. To check this, remove the sink sprayer head and turn on the faucet. If the water period out of the hose is weak, the diverter is to blame.
- The sprayer pulsates like a machine gun.
- Water continues to flow out of the faucet spout when you're using the sink sprayer.
Oftentimes, a misbehaving diverter needs just light scrubbing with a toothbrush and a good rinse. Just since removing a diverter usually requires major faucet disassembly, it's best to simply supersede the diverter rather than risk taking information technology autonomously again.
Diverter styles and removal procedures differ widely. Some are small valves similar the one shown hither. Others are larger cylinders that don't look like valves at all. Some newer diverters aren't inside the faucet, merely are instead connected to the sprayer hose below. So the first stride in diverter repair is finding a diagram of your faucet. If you can't discover your owner'due south transmission, do an online search. Type in the manufacturer of your faucet followed by "faucet parts diagram." With a fiddling searching, y'all'll find an illustration showing your faucet'south internal parts. Y'all'll besides find several sources for replacement parts online. To find a local supplier, check theYellow Pages nether "Plumbing, Fixtures" or search online.
Required Tools for this Project
Accept the necessary tools for this DIY project lined up before you kickoff—y'all'll relieve time and frustration.
You lot may besides demand a basin wrench.
Originally Published: Nov 18, 2022

Source: https://www.familyhandyman.com/project/how-to-fix-a-leaking-sink-sprayer/
Posted by: harrissher1970.blogspot.com
0 Response to "How To Repair A Leaking Kitchen Sink Sprayer Head"
Post a Comment